

Interceptors in nest js. Understanding them by building an event log interceptor.


In this article, you are going to learn about interceptors in nest js by building a simple nest project.
According to the official nest documentation, interceptors are defined as a class annotated with the @Injectable() decorator and implement the NestInterceptor interface. You can read more about interceptors on the official Nest JS documentation.
The full code of this article can be found in the GitHub repository.
Prerequisites.
Basic knowledge of Typescript.
Basic knowledge of Nest JS.
Basic knowledge of Git.
Project set up.
Create the new application. Head over to your desired folder and create a new nest js application.
cd projects
Create a new application named nest-audit-trails and select your preferred package manager
nest new audit-trails
Navigate inside the application and start the server.
yarn start:dev
At this stage, you will create the user module (module, services and controllers) by running the commands
nest g module auth
nest g controller auth --no-spec
nest g  service auth --no-spec
Go ahead and create the database module. This will house all the entities and migrations for our project.
mkdir database
cd database
mkdir entities
mkdir migrations
Install the following packages by running the commands
yarn add @nestjs/typeorm typeorm pg @nestjs/config
This command installs the
config folder, this acts as an interface between the .env file and we will use it to load the environment variables.
@nestjs/typeorm and typeorm packages. These are typeorm wrappers that enables you to access the orm.
pg - This is the Postgres driver for nest js.
Set up the config module by heading over to the
app.module.tsfile and adding the following in the import block just before the AuthModule.ConfigModule.forRoot({ envFilePath: '.env', # tells the config module the location of the env file. isGlobal: true, # setting the config module to be global so that we can access it in any module. }),1.0 Database set up.
You can now set up the database module configurations with the config module already set up.
Create a new file config.ts at the root of your project.
touch config.tsAnd paste in the following lines of code. These will be responsible for the database connections and integrations.
import { registerAs } from '@nestjs/config';
import { config as dotenvConfig } from 'dotenv';
import { DataSource, DataSourceOptions } from 'typeorm';

dotenvConfig({ path: '.env' });

const config = {
  type: 'postgres',
  host: `${process.env.DATABASE_HOST}`,
  port: `${process.env.DATABASE_PORT}`,
  username: `${process.env.DATABASE_USERNAME}`,
  password: `${process.env.DATABASE_PASSWORD}`,
  database: `${process.env.DATABASE_NAME}`,
  entities: ['dist/**/*.entity{.ts,.js}'],
  migrations: ['dist/src/database/migrations/*{.ts,.js}'],
  autoLoadEntities: true,
  synchronize: false,
};

export default registerAs('typeorm', () => config);
export const connectionSource = new DataSource(config as DataSourceOptions);
With the config.ts file put up, you need to load them in the module so that the application can connect to the database, thus making the following refactors in your app.module.ts file.
imports: [
    ConfigModule.forRoot({
      envFilePath: '.env',
      isGlobal: true,
    }),
    ConfigModule.forRoot({
      isGlobal: true,
      load: [typeorm],
    }),
    TypeOrmModule.forRootAsync({
      inject: [ConfigService],
      useFactory: async (configService: ConfigService) =>
        configService.get('typeorm'),
    }),
    AuthModule,
  ],
To make use of Typeorm migrations, you will have to add the following scripts in the package.json this makes it easier for one to create, run and revert migrations.
  "typeorm": "ts-node ./node_modules/typeorm/cli",
    "migration:run": "npm run typeorm migration:run -- -d ./config.ts",
    "migration:generate": "npm run typeorm -- -d ./config.ts migration:generate ./src/database/migrations/migrations/$npm_config_name",
    "migration:create": "npm run typeorm -- migration:create ./src/database/migrations/migrations/$npm_config_name",
    "migration:revert": "npm run typeorm -- -d ./config.ts migration:revert"
With the scripts set up, you can now add the user entity. For this article, you will come up with a simple user entity with just the email and password fields. In the database/entities file, create a file user.entity.ts and paste the following lines of code.
/* user.entity.ts */
import {
  Column,
  CreateDateColumn,
  Entity,
  Generated,
  PrimaryGeneratedColumn,
  UpdateDateColumn,
} from 'typeorm';

@Entity()
export class User {
  @PrimaryGeneratedColumn()
  id: number;

  @Generated('uuid')
  pkid: string;

  @Column({ unique: true })
  email: string;

  @Column({ nullable: false })
  password: string;

  @UpdateDateColumn()
  updatedAt: Date;

  @CreateDateColumn()
  createdAt: Date;
}
With the entity in place, migrations can now be generated and run to create the user table in the database.
yarn migration:generate # this generates the migration.
yarn migration:run # runs the migration and  creates the table in the database
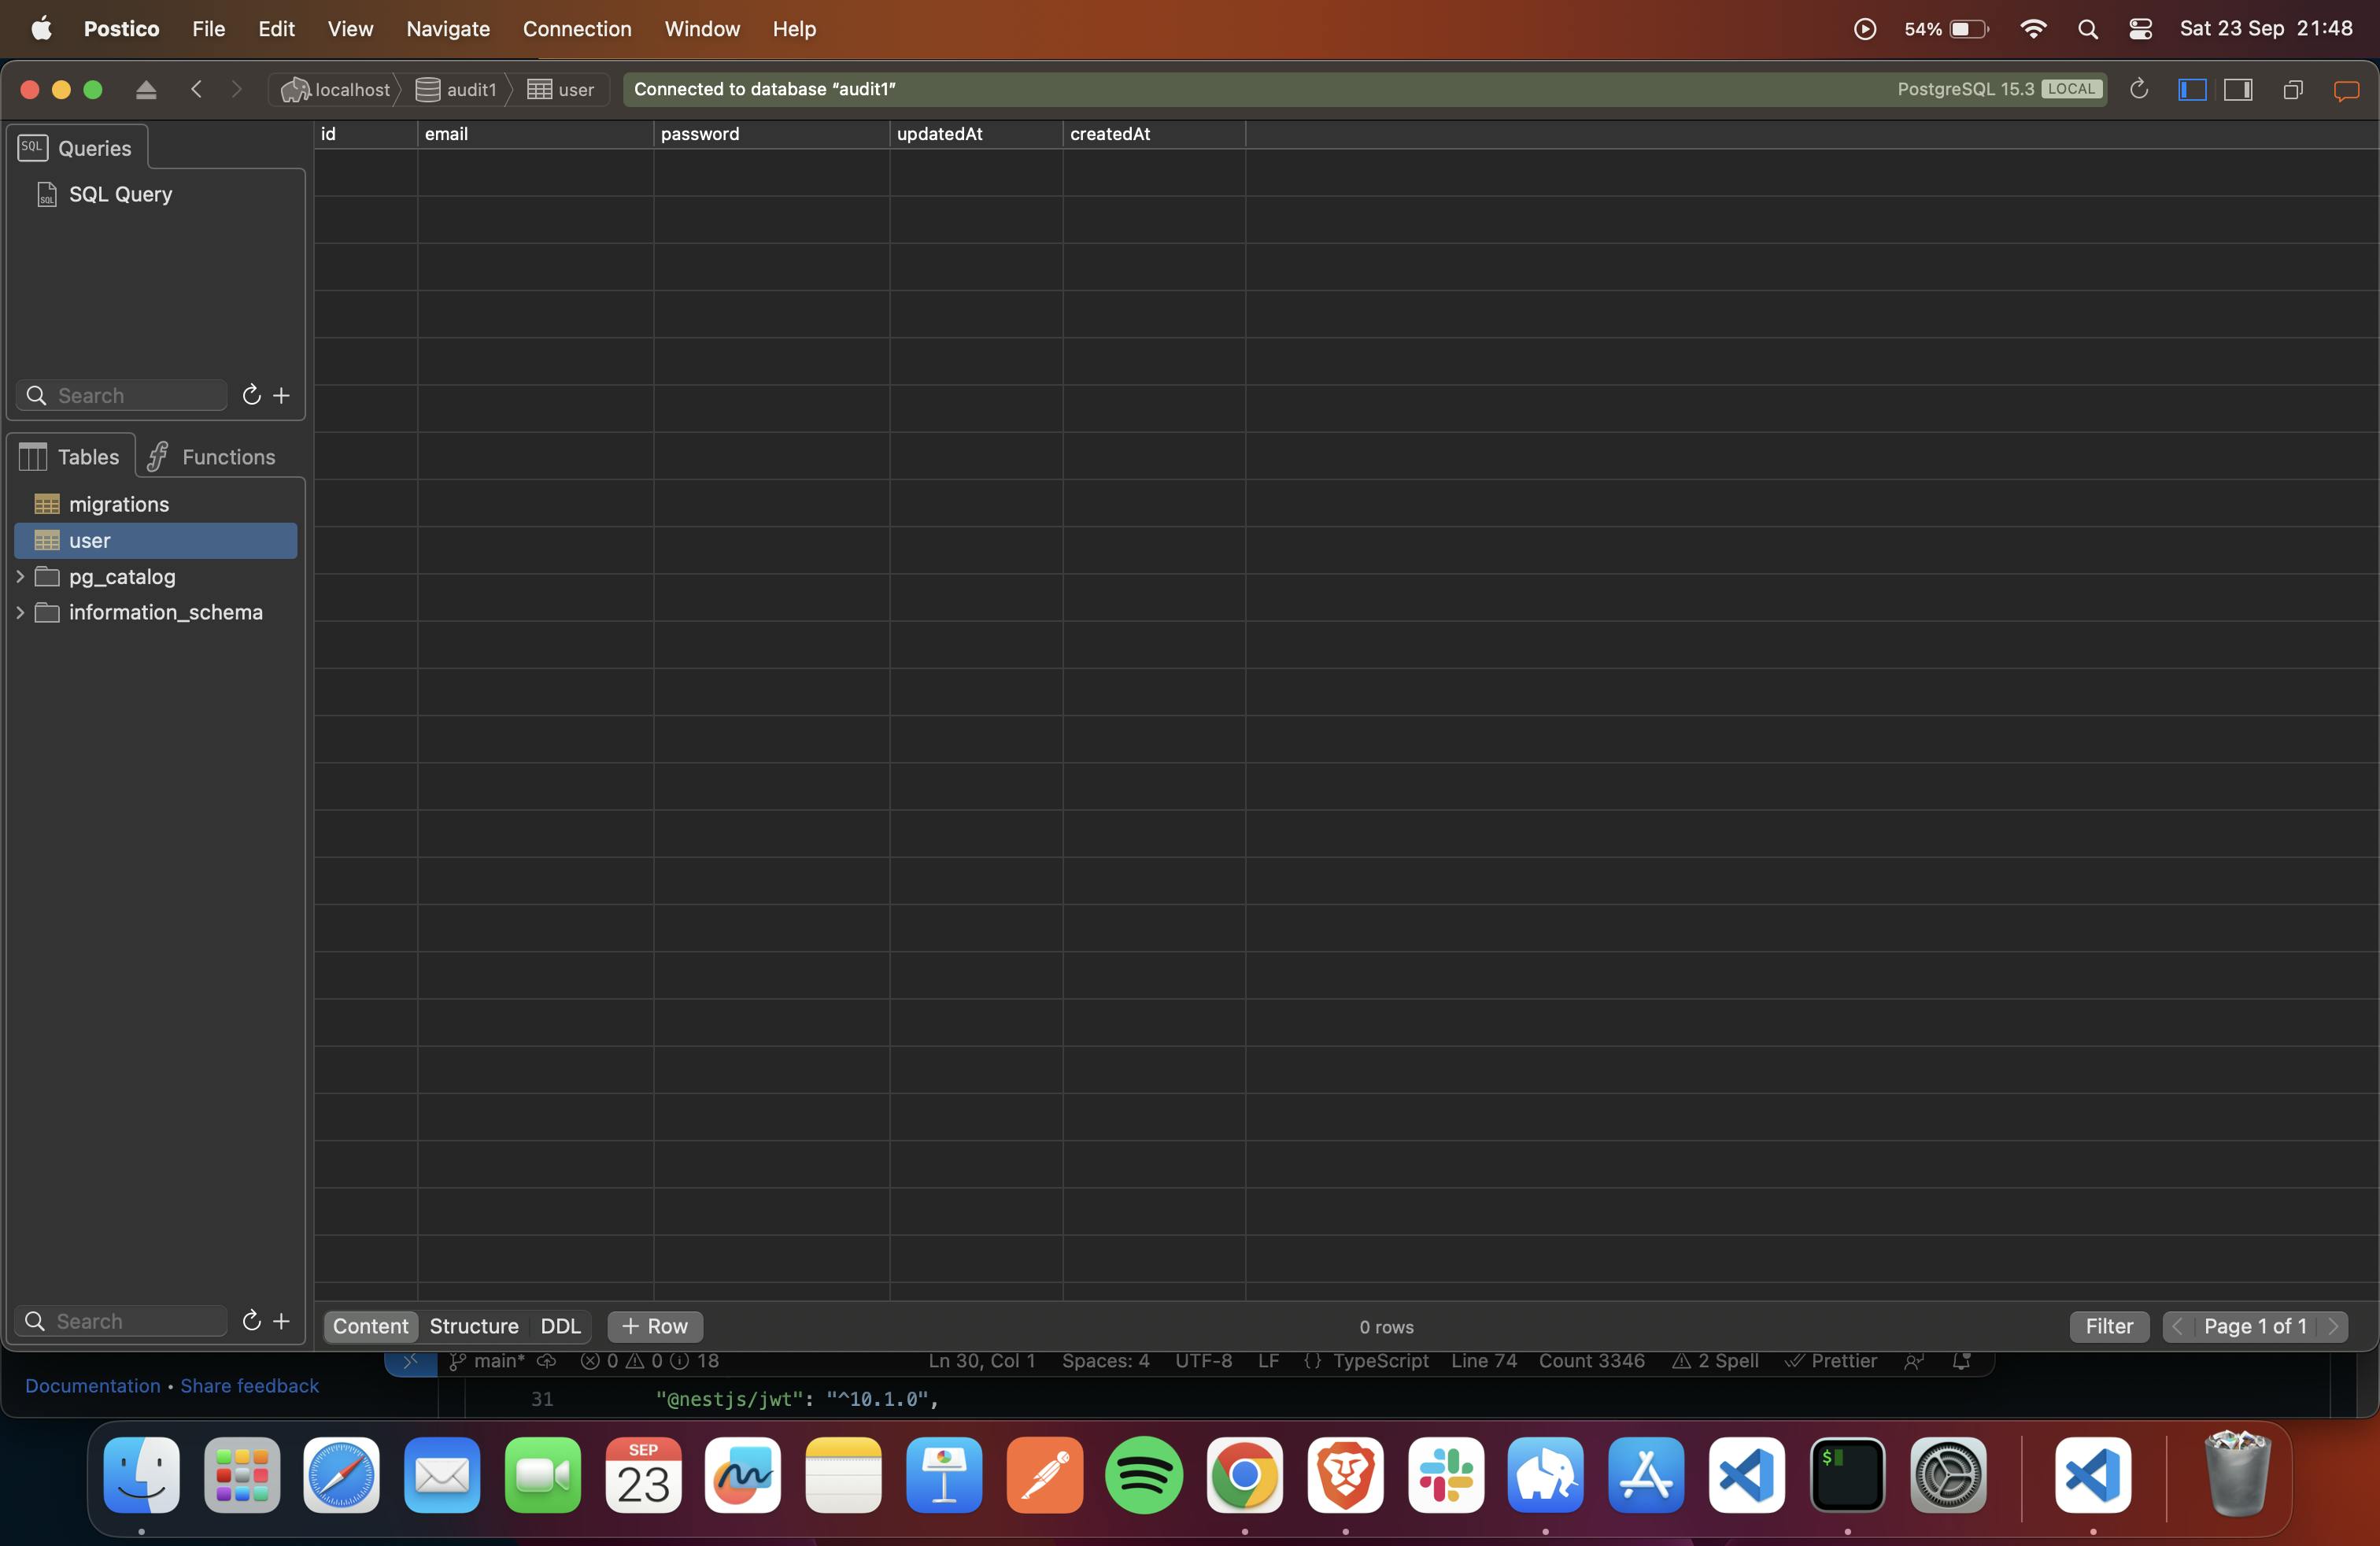
You can now access your database via your preferred tool. I am on mac thus using postico and the user table should be similar to the one below.
1.1 Create the signup and log-in functionality.
The authentication service encapsulates the user authentication logic in the application. In the auth.service.ts file, paste the following lines of code.
import { BadRequestException, Injectable, Logger } from '@nestjs/common';
import { InjectRepository } from '@nestjs/typeorm';
import { EntityManager, Repository } from 'typeorm';
import { User } from '../database/entities/user.entity';
import { RegisterUserDTO } from './dto';
import * as argon from 'argon2';
import { JwtService } from '@nestjs/jwt';
@Injectable()
export class AuthService {
  private logger = new Logger('Auth');
  constructor(
    @InjectRepository(User)
    private readonly userRepo: Repository<User>,
    private entityManager: EntityManager,
    private jwtService: JwtService,
  ) {}

  async getUserByEmail(email: string) {
    return await this.userRepo.findOne({
      where: {
        email: email,
      },
    });
  }
  async create(dto: RegisterUserDTO) {
    const { email, password } = dto;
    const userExists = await this.getUserByEmail(email);
    if (userExists) {
      throw new BadRequestException('User with credentials already exists');
    }
    const hashedPassword = await argon.hash(password);
    console.log(hashedPassword);
    const newUser = await this.userRepo.create({
      email: email,
      password: hashedPassword,
    });
    console.log(newUser);
    // await newUser.save();
    await this.entityManager.save(newUser);
    this.logger.log(`User with email ${dto.email} successfully registered`);
    return newUser;
  }

  async login(dto: RegisterUserDTO) {
    const { email, password } = dto;
    const userExists = await this.getUserByEmail(email);
    if (!userExists) {
      throw new BadRequestException('User with credentials not found');
    }
    const isPasswordMatch = await argon.verify(userExists.password, password);
    if (!isPasswordMatch) {
      throw new BadRequestException(
        'User with credentials not found - password',
      );
    }
    const payload = { sub: userExists.id };
    const token = await this.jwtService.signAsync(payload);
    this.logger.log(`User with email ${dto.email} successfully signed in`);
    return {
      userExists,
      token,
    };
  }
}
and the auth controllers.
// auth.controller.ts
import {
  Body,
  Controller,
  Get,
  HttpCode,
  HttpStatus,
  Post,
} from '@nestjs/common';
import { AuthService } from './auth.service';
import { RegisterUserDTO } from './dto';
import { ApiOperation, ApiTags } from '@nestjs/swagger';
import { GetUser, Public } from '../common/decorators';

@ApiTags('Authentication')
@Controller('auth')
export class AuthController {
  constructor(private authService: AuthService) {}

  @Post('token')
  @ApiOperation({
    summary: 'this is the login API',
  })
  @Public()
  async login(@Body() dto: RegisterUserDTO) {
    return await this.authService.login(dto);
  }
  @Post('register')
  @ApiOperation({
    summary: 'this is the sign up API',
  })
  @Public()
  async register(@Body() dto: RegisterUserDTO) {
    return await this.authService.create(dto);
  }

  @Get('/me')
  @ApiOperation({
    summary: 'This is the profile endpoint',
  })
  @HttpCode(HttpStatus.OK)
  async profile(@GetUser() user: any) {
    return this.authService.getUserById(user);
  }
}
Authentication guard.
With the authentication service in place, you need to set up the authentication guard which will check whether the token passed by the user is valid and will be doing access control.
Create a new folder in the common folder named guards and create two files ie public.ts and index.ts
mkdir guards
cd guards
touch index.ts
touch auth.guard.ts
Paste in the following lines of code in the auth.guard.ts file
import {
  CanActivate,
  ExecutionContext,
  Injectable,
  UnauthorizedException,
} from '@nestjs/common';
import { Reflector } from '@nestjs/core';
import { JwtService } from '@nestjs/jwt';
import { Request } from 'express';
const IS_PUBLIC_KEY = 'isPublic';
@Injectable()
export class AuthGuard implements CanActivate {
  constructor(
    private jwtService: JwtService,
    private reflector: Reflector,
  ) {}

  async canActivate(context: ExecutionContext): Promise<boolean> {
    const isPublic = this.reflector.getAllAndOverride<boolean>(IS_PUBLIC_KEY, [
      context.getHandler(),
      context.getClass(),
    ]);
    if (isPublic) {
      // 💡 See this condition
      return true;
    }

    const request = context.switchToHttp().getRequest();
    const token = this.extractTokenFromHeader(request);
    if (!token) {
      throw new UnauthorizedException();
    }
    try {
      const payload = await this.jwtService.verifyAsync(token, {
        secret: 'fgyhjk',
      });
      // 💡 We're assigning the payload to the request object here
      // so that we can access it in our route handlers
      request['user'] = payload;
    } catch {
      throw new UnauthorizedException();
    }
    return true;
  }

  private extractTokenFromHeader(request: Request): string | undefined {
    const [type, token] = request.headers.authorization?.split(' ') ?? [];
    return type === 'Bearer' ? token : undefined;
  }
}
Export the AuthGuard from the index.ts file by adding the following lines of code to the index.ts
export * from './auth.guard.ts
To enable the AuthGuard globally, in your app.module.ts file the providers block, add the following lines of code.
providers: [
//other suff
 {
   provide: APP_GUARD,
   useClass: AuthGuard
 }
]
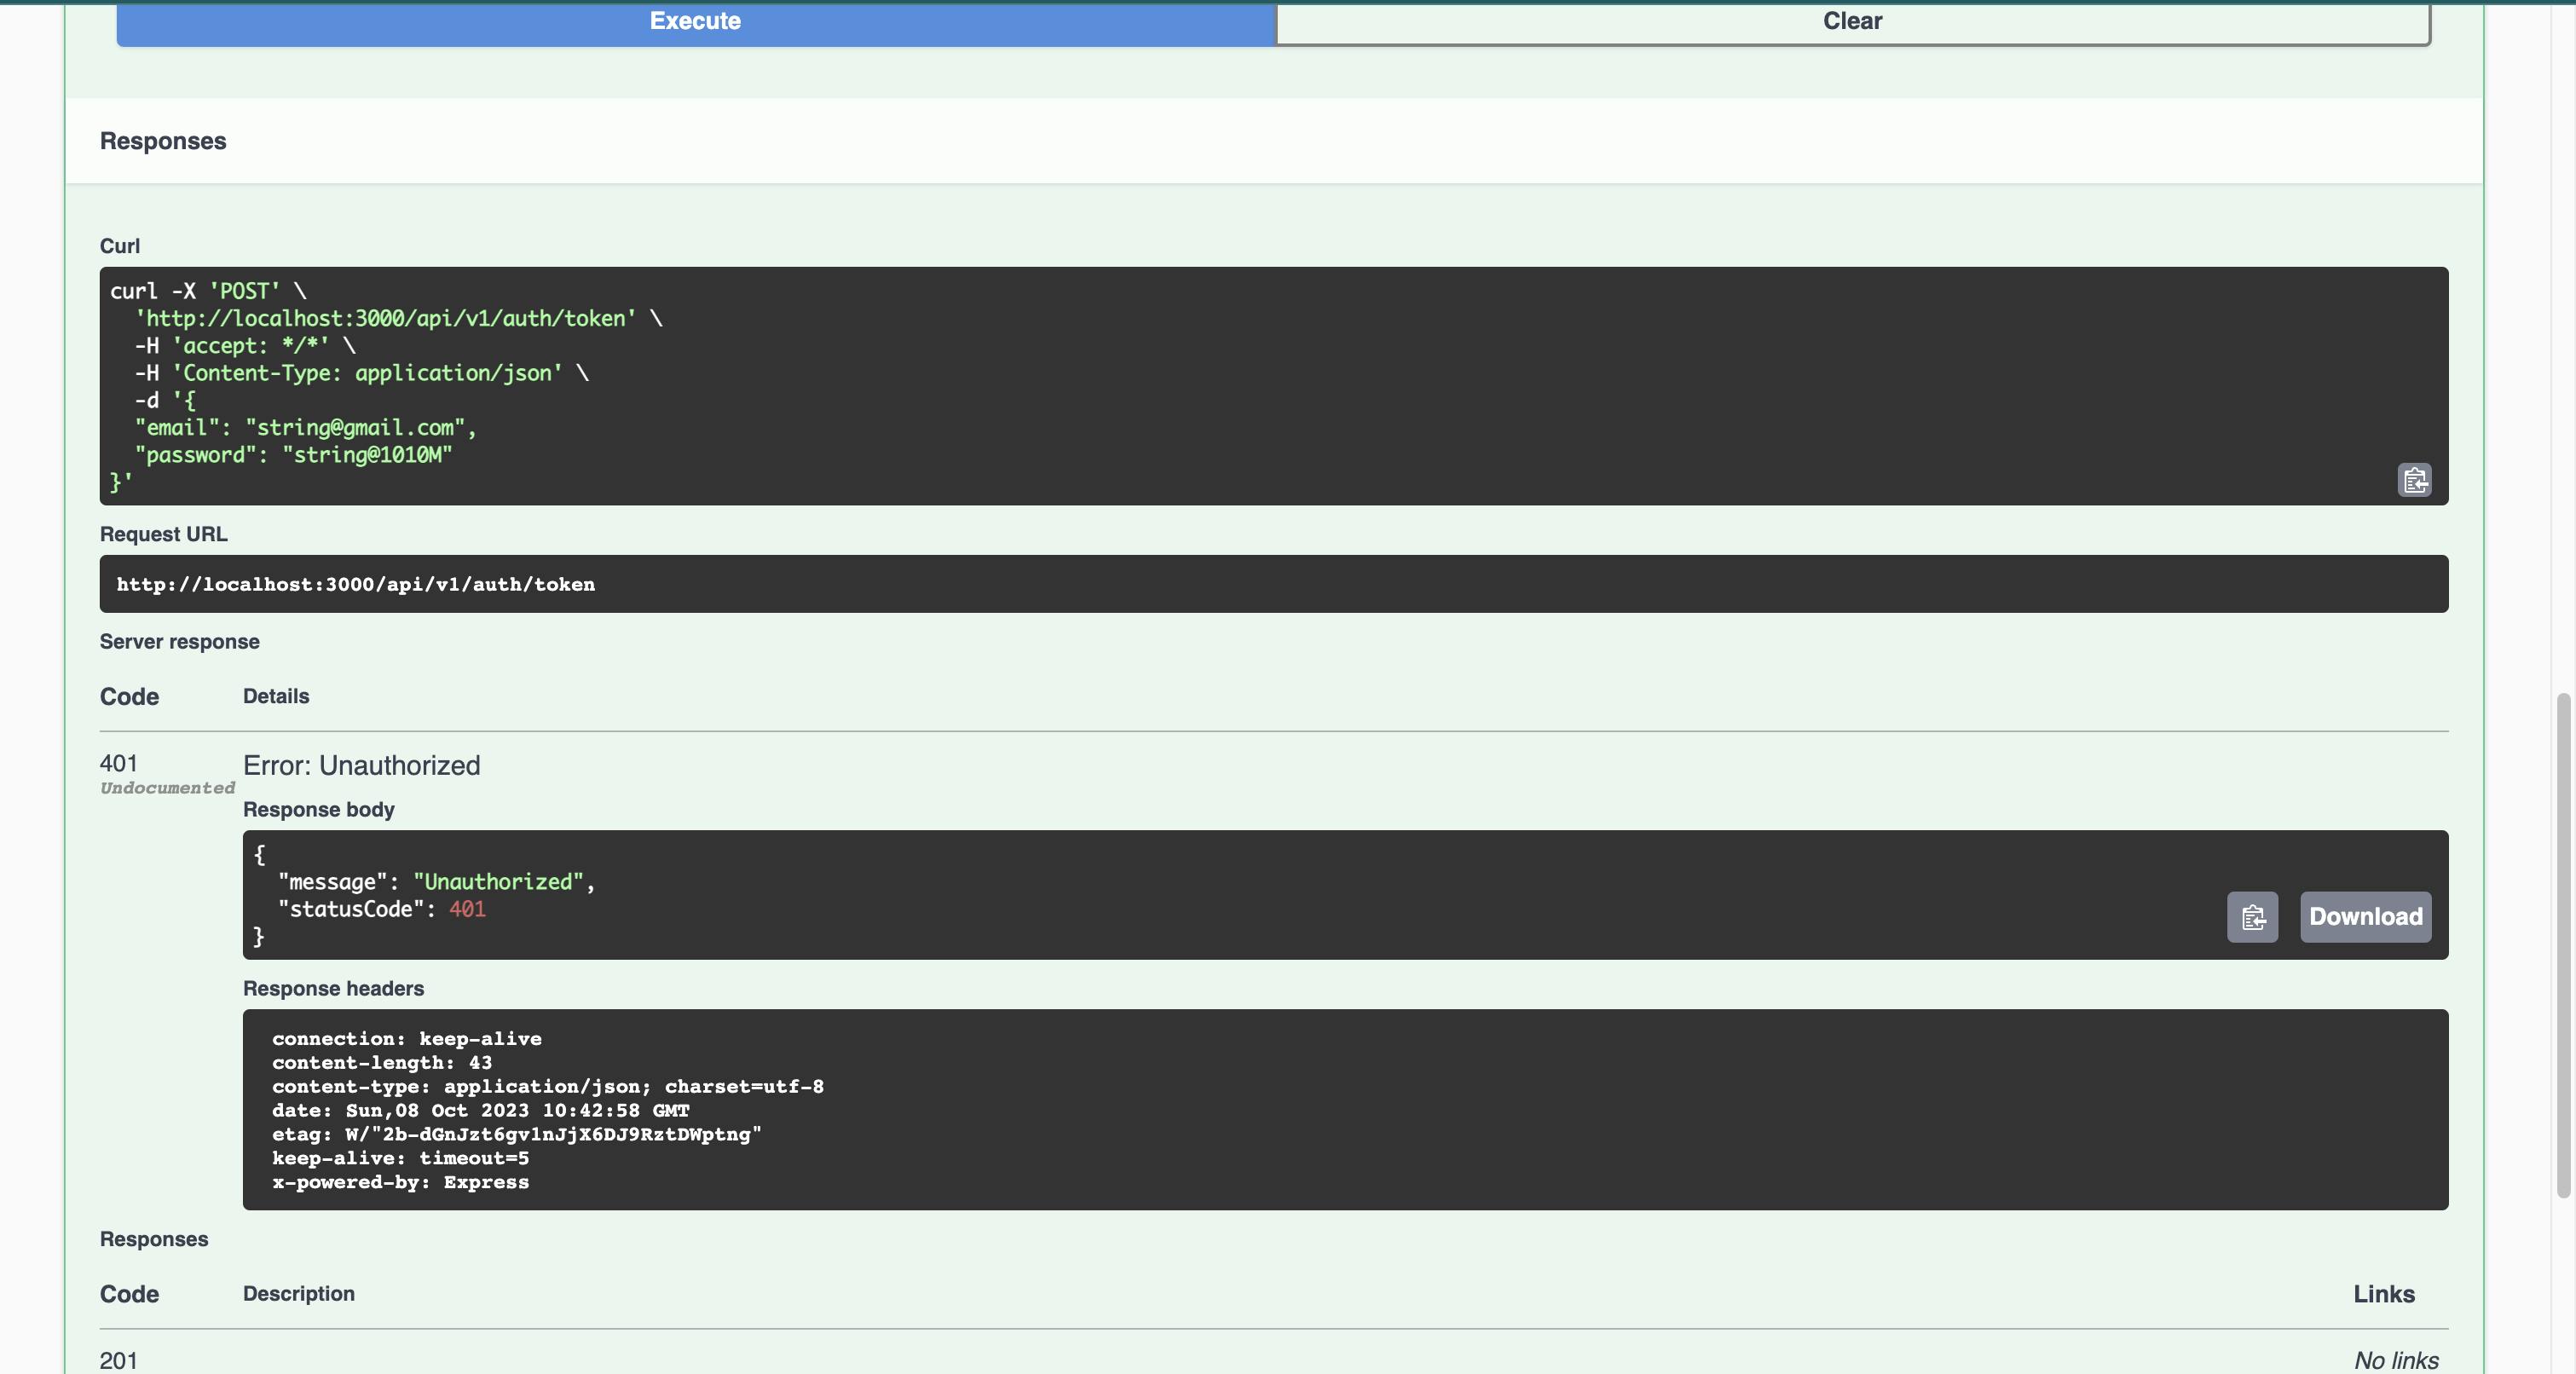
Head over to the swagger API and try requesting the login endpoint, you will be hit with an error message as per the image attached below.
To fix this, in the common folder, create a new folder named decorators and paste in the following lines of code.
import { SetMetadata } from '@nestjs/common';

export const IS_PUBLIC_KEY = 'isPublic';
export const Public = () => SetMetadata(IS_PUBLIC_KEY, true);
Create a new file index.ts and export the new Public decorator.
export * from './public.ts'
To see this in action, head over to the auth.controller.ts file and add the @Public() decorator to either the whole controller file or to specific routes.
1.2 Profile endpoint.
In this section, you will build a profile endpoint that gets the details for the specific user. To achieve this, you need to develop a new decorator that gets the user from the request and returns the user. You can name this decorator your preferred name.
import { ExecutionContext, createParamDecorator } from '@nestjs/common';

export const GetUser = createParamDecorator(
  (_data: unknown, context: ExecutionContext) => {
    const request: any = context.switchToHttp().getRequest();
    const data = request.user.user;
    return data;
  },
);
And export it from the index.ts in the decorators file
export * from './get-user-decorator.ts'
Now head over to your auth.contoller.ts file and create the new endpoint.
@Get('/me')
  @ApiOperation({
    summary: 'This is the profile endpoint',
  })
  @HttpCode(HttpStatus.OK)
  async profile(@GetUser() user: any) {
    return this.authService.getUserById(user);
  }
And the getUserbyId method in the auth.service.ts file.
  async getUserById(id: number) {
    return await this.userRepo.findOne({
      where: {
        id: id,
      },
    });
  }
2.0 The product resource.
With the authentication endpoints up and running, you will now shift the focus to the product resources. In this section, you will create the product services and controllers and expose them via the REST APIs.
In the base of the application in the terminal, run the following to create the product resource
nest g resource products
2.1 Product Entity.
In the folder where your entities are housed, create a new file named Product. entity.ts and paste in the following lines of code.
import {
  Column,
  CreateDateColumn,
  Entity,
  Generated,
  ManyToOne,
  PrimaryGeneratedColumn,
  UpdateDateColumn,
} from 'typeorm';
import { User } from './user.entity';

@Entity()
export class Product {
  @PrimaryGeneratedColumn()
  id: number;

  @Generated('uuid')
  pkid: string;

  @Column()
  name: string;

  @Column()
  price: string;

  @Column()
  discount_price: string;

  @Column()
  url: string;

  @CreateDateColumn()
  createdAt: Date;

  @UpdateDateColumn()
  updatedAt: Date;

  @ManyToOne(() => User, (user) => user.products)
  owner: User;
}
In the code above, you will notice that we have added a new concept namely @ManyToOne, this decorator specifies the relationship between the user and the Product entities to be OneToMany ie one user can have many products on the platform.
To make the relationship complete, add the following lines of code to the user entity file.
  // this is the link to products
  @OneToMany(() => Product, (product) => product.owner)
  products: Product[];
2.2 Product service.
You need a way to interact with the database, in comes the service file, here, you will add all the logic that interacts with the database and the business logic. In the product.service.ts add the following lines of code. These are CRUD operations that make it easy to add, remove, fetch and update the product instances.
import { Injectable } from '@nestjs/common';
import { InjectRepository } from '@nestjs/typeorm';
import { Product } from '../database/entities/product.entity';
import { EntityManager, Repository } from 'typeorm';
import { CreateProductDTO } from './dto';

@Injectable()
export class ProductsService {
  constructor(
    @InjectRepository(Product) private productRepo: Repository<Product>,
    private entityManager: EntityManager,
  ) {}

  async create(dto: CreateProductDTO) {
    const product = await this.productRepo.create({
      ...dto,
    });
    return await this.entityManager.save(product);
  }

  async getAll() {
    return await this.productRepo.find({
      order: { createdAt: 'DESC' },
    });
  }

  async getById(id: number) {
    return await this.productRepo.findOne({
      where: {
        id: id,
      },
    });
  }

  async delete(id: number) {
    return await this.entityManager.delete(Product, id);
  }
}
2.3 Product controller.
The services need a way to communicate with the outside, thus entering the controller's file. This will house the logic that interacts with the API's and the outside world. In the product.controller.ts file, add the following lines of code.
import {
  Body,
  Controller,
  Delete,
  Get,
  HttpCode,
  HttpStatus,
  Param,
  Post,
} from '@nestjs/common';
import { ProductsService } from './products.service';
import { CreateProductDTO } from './dto';
import { ApiOperation } from '@nestjs/swagger';

@Controller('products')
export class ProductsController {
  constructor(private readonly productsService: ProductsService) {}

  @Get()
  @HttpCode(HttpStatus.OK)
  @ApiOperation({
    summary: 'This api  gets all the products',
  })
  async getAll() {
    return await this.productsService.getAll();
  }

  @Post()
  @HttpCode(HttpStatus.CREATED)
  @ApiOperation({
    summary: 'This api creates a  product',
  })
  async create(@Body() dto: CreateProductDTO) {
    return await this.productsService.create(dto);
  }

  @Get('id')
  @HttpCode(HttpStatus.OK)
  @ApiOperation({
    summary: 'This api  gets all  product by id',
  })
  async getById(@Param('id') id: number) {
    return await this.productsService.getById(id);
  }

  @Delete('id')
  @HttpCode(HttpStatus.NO_CONTENT)
  @ApiOperation({
    summary: 'This api  deletes a product by Id',
  })
  async delete(@Param('id') id: number) {
    return await this.productsService.delete(id);
  }
}
This brings an end to the product resource development. To test this out head to your swagger documentation or your preferred API testing tool and test out the functionalities.
3.0 Audit trail functionality.
With the auth and products functionality up and running, It is now time to deal heads on with the main point of the article, tada audit trail functionality. To start it off, create a new module named audit trail either manually or by using an interceptor.
Create the audit trails entity.
//  audit.trail.entity.ts
import {
  Column,
  CreateDateColumn,
  Generated,
  ManyToOne,
  PrimaryGeneratedColumn,
} from 'typeorm';
import { User } from './user.entity';

export class AuditTrail {
  @PrimaryGeneratedColumn()
  id: number;

  @Generated('uuid')
  pkid: string;

  @Column()
  description: string;

  @CreateDateColumn()
  createdAt: Date;

  @ManyToOne(() => User, (user) => user.auditTrails)
  user: User;
}
And run the migrations to create the table in the database using the command.
yarn migration:generate
yarn migration:run
And create the audit trail resource by running the command.
nest g resource audit-trail --no-spec
As is the practice throughout this tutorial, the services are created first, you can easily copy the code below and paste it in your audit-trail-service.ts file.
import { Injectable } from '@nestjs/common';
import { InjectRepository } from '@nestjs/typeorm';
import { AuditTrail } from '../database/entities/audit.trail.entity';
import { EntityManager, Repository } from 'typeorm';
import { User } from '../database/entities/user.entity';

@Injectable()
export class AuditTrailService {
  constructor(
    @InjectRepository(AuditTrail)
    private auditRepository: Repository<AuditTrail>,
    @InjectRepository(User)
    private userRepository: Repository<User>,
    private entityManager: EntityManager,
  ) {}

  async getUserRepository(user) {
    return await this.auditRepository.find({
      where: {
        user: user,
      },
      order: { createdAt: 'DESC' },
    });
  }

  async create(data) {
    const newAuditTrail = await this.auditRepository.create({
      ...data,
    });
    return await this.entityManager.save(newAuditTrail);
  }
}
Now add the following lines of code in your auth.controller.ts.
import { Controller, Get } from '@nestjs/common';
import { AuditTrailService } from './audit-trail.service';
import { GetUser } from '../common/decorators';

@Controller('audit-trail')
export class AuditTrailController {
  constructor(private readonly auditTrailService: AuditTrailService) {}

  @Get('')
  async getUserTrail(@GetUser() user: any) {
    return this.auditTrailService.getUserRepository(user);
  }
}
This creates a new API endpoint and gets user audit trails, you can go ahead and test this API via Swagger or Postman.
Log the product-creating and fetching process.
To put the audit trail functionality in use, head over to the product service file and modify the following methods as follows.
  async create(dto: CreateProductDTO, user: any) {
    const userExists = await this.authService.getUserById(user);
    console.log(userExists, 'userExists user', user);
    const product = await this.productRepo.create({
      ...dto,
      owner: userExists,
    });
    this.auditServie.create({
      description: `User creating a product`,
      user,
    });
    return await this.entityManager.save(product);
  }
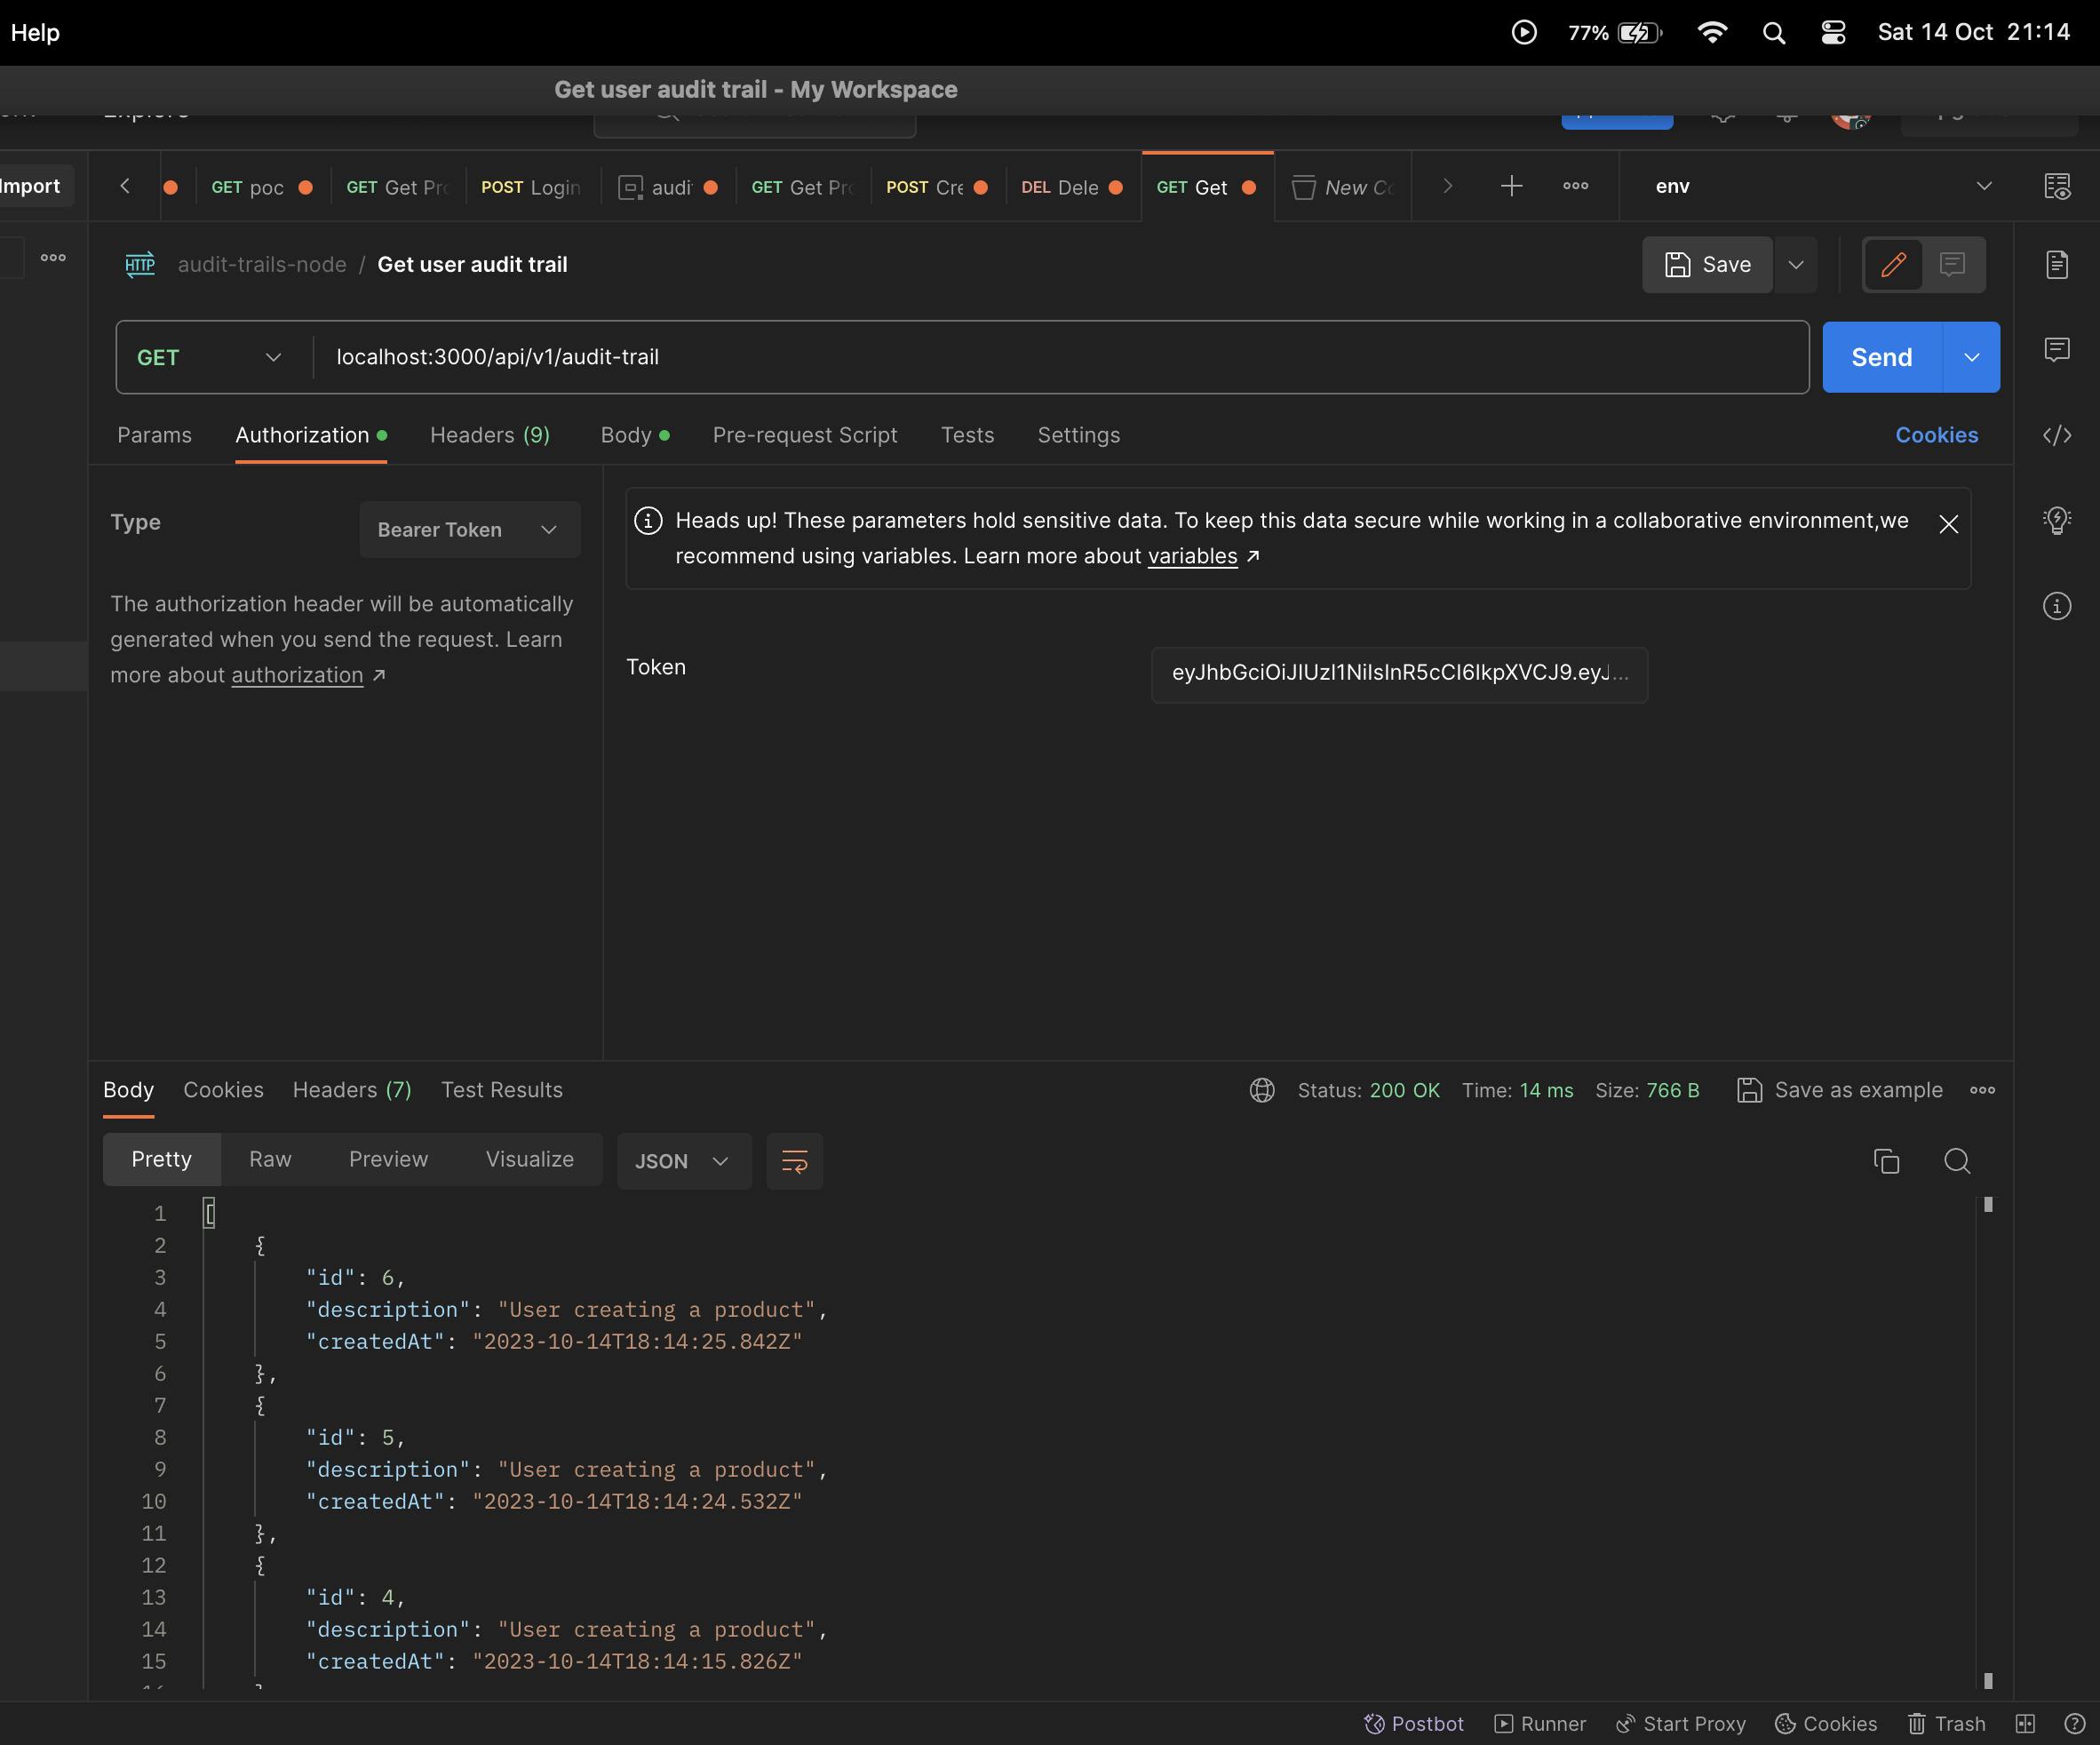
Save the file and go and create a new product. Then reload the get-user-trails endpoint and you will see the newly created audit trail as illustrated on the image below.
With the first method done, In the next section, you will learn how to create an interceptor that automatically does this step to avoid repeating the same lines of code repeatedly.
3.1 Creating the audit trail interceptor.
In the previous section, you have learned how to create an audit trail by invoking the method in various services. However, this can easily lead to a bloated file. In this section, you will learn how to create an interceptor that automatically does this and you may pass any parameters via a custom decorator.
In the common/interceptors folder, create a new file named audit.trail.interceptor.ts and add the following lines of code.
import {
  CallHandler,
  ExecutionContext,
  Injectable,
  NestInterceptor,
} from '@nestjs/common';
import { Observable, tap } from 'rxjs';

import { AuditTrailService } from '../../audit-trail/audit-trail.service';

import { AuthService } from '../../auth/auth.service';
import { Reflector } from '@nestjs/core';

const AUDIT_TRAIL_DESCRIPTION = 'AUDIT_TRAIL_DESCRIPTION';
@Injectable()
export class AuditTrailInterceptor implements NestInterceptor {
  constructor(
    private auditService: AuditTrailService,
    private userService: AuthService,
    private reflector: Reflector,
  ) {}

  intercept(
    context: ExecutionContext,
    next: CallHandler<any>,
  ): Observable<any> | Promise<Observable<any>> {
    const request = context.switchToHttp().getRequest();
    const { user } = request;

    const description = this.reflector.getAllAndOverride<boolean>(
      AUDIT_TRAIL_DESCRIPTION,
      [context.getHandler(), context.getClass()],
    );

    return next.handle().pipe(
      tap(async () => {
        if (user) {
          const userExists = await this.userService.getUserById(user.sub);
          await this.auditService.create({
            user: userExists,
            description: description ? description : 'Desc not specified',
          });
        }
      }),
    );
  }
}
The above lines of code extend the NestInterceptor module and enable you as the developer to create custom additions to it. The AuditTrailInterceptor is made to be dependency injectable by using the @Injectable decorator. The reflector class is also used to get the description value passed in the custom decorator you are about to create. The user object is also gotten from the request object and the two values are then passed to the audit service's create method available through dependency injection.
To create the custom decorator, add the following lines of code to a new file audit-trail-decorator.ts file.
import { CustomDecorator, SetMetadata } from '@nestjs/common';

const AUDIT_TRAIL_DESCRIPTION = 'AUDIT_TRAIL_DESCRIPTION';

export const AuditTrailDecorator = (description): CustomDecorator =>
  SetMetadata(AUDIT_TRAIL_DESCRIPTION, description);
To bring these two custom functionalities together, head over to the product.controller.ts file and add the following decorator to the getAll method. Your new method should resemble the one pasted below.
@Get()
  @HttpCode(HttpStatus.OK)
  @ApiOperation({
    summary: 'This api  gets all the products',
  })
  @AuditTrailDecorator('Fetch all products')
  async getAll() {
    return await this.productsService.getAll();
  }
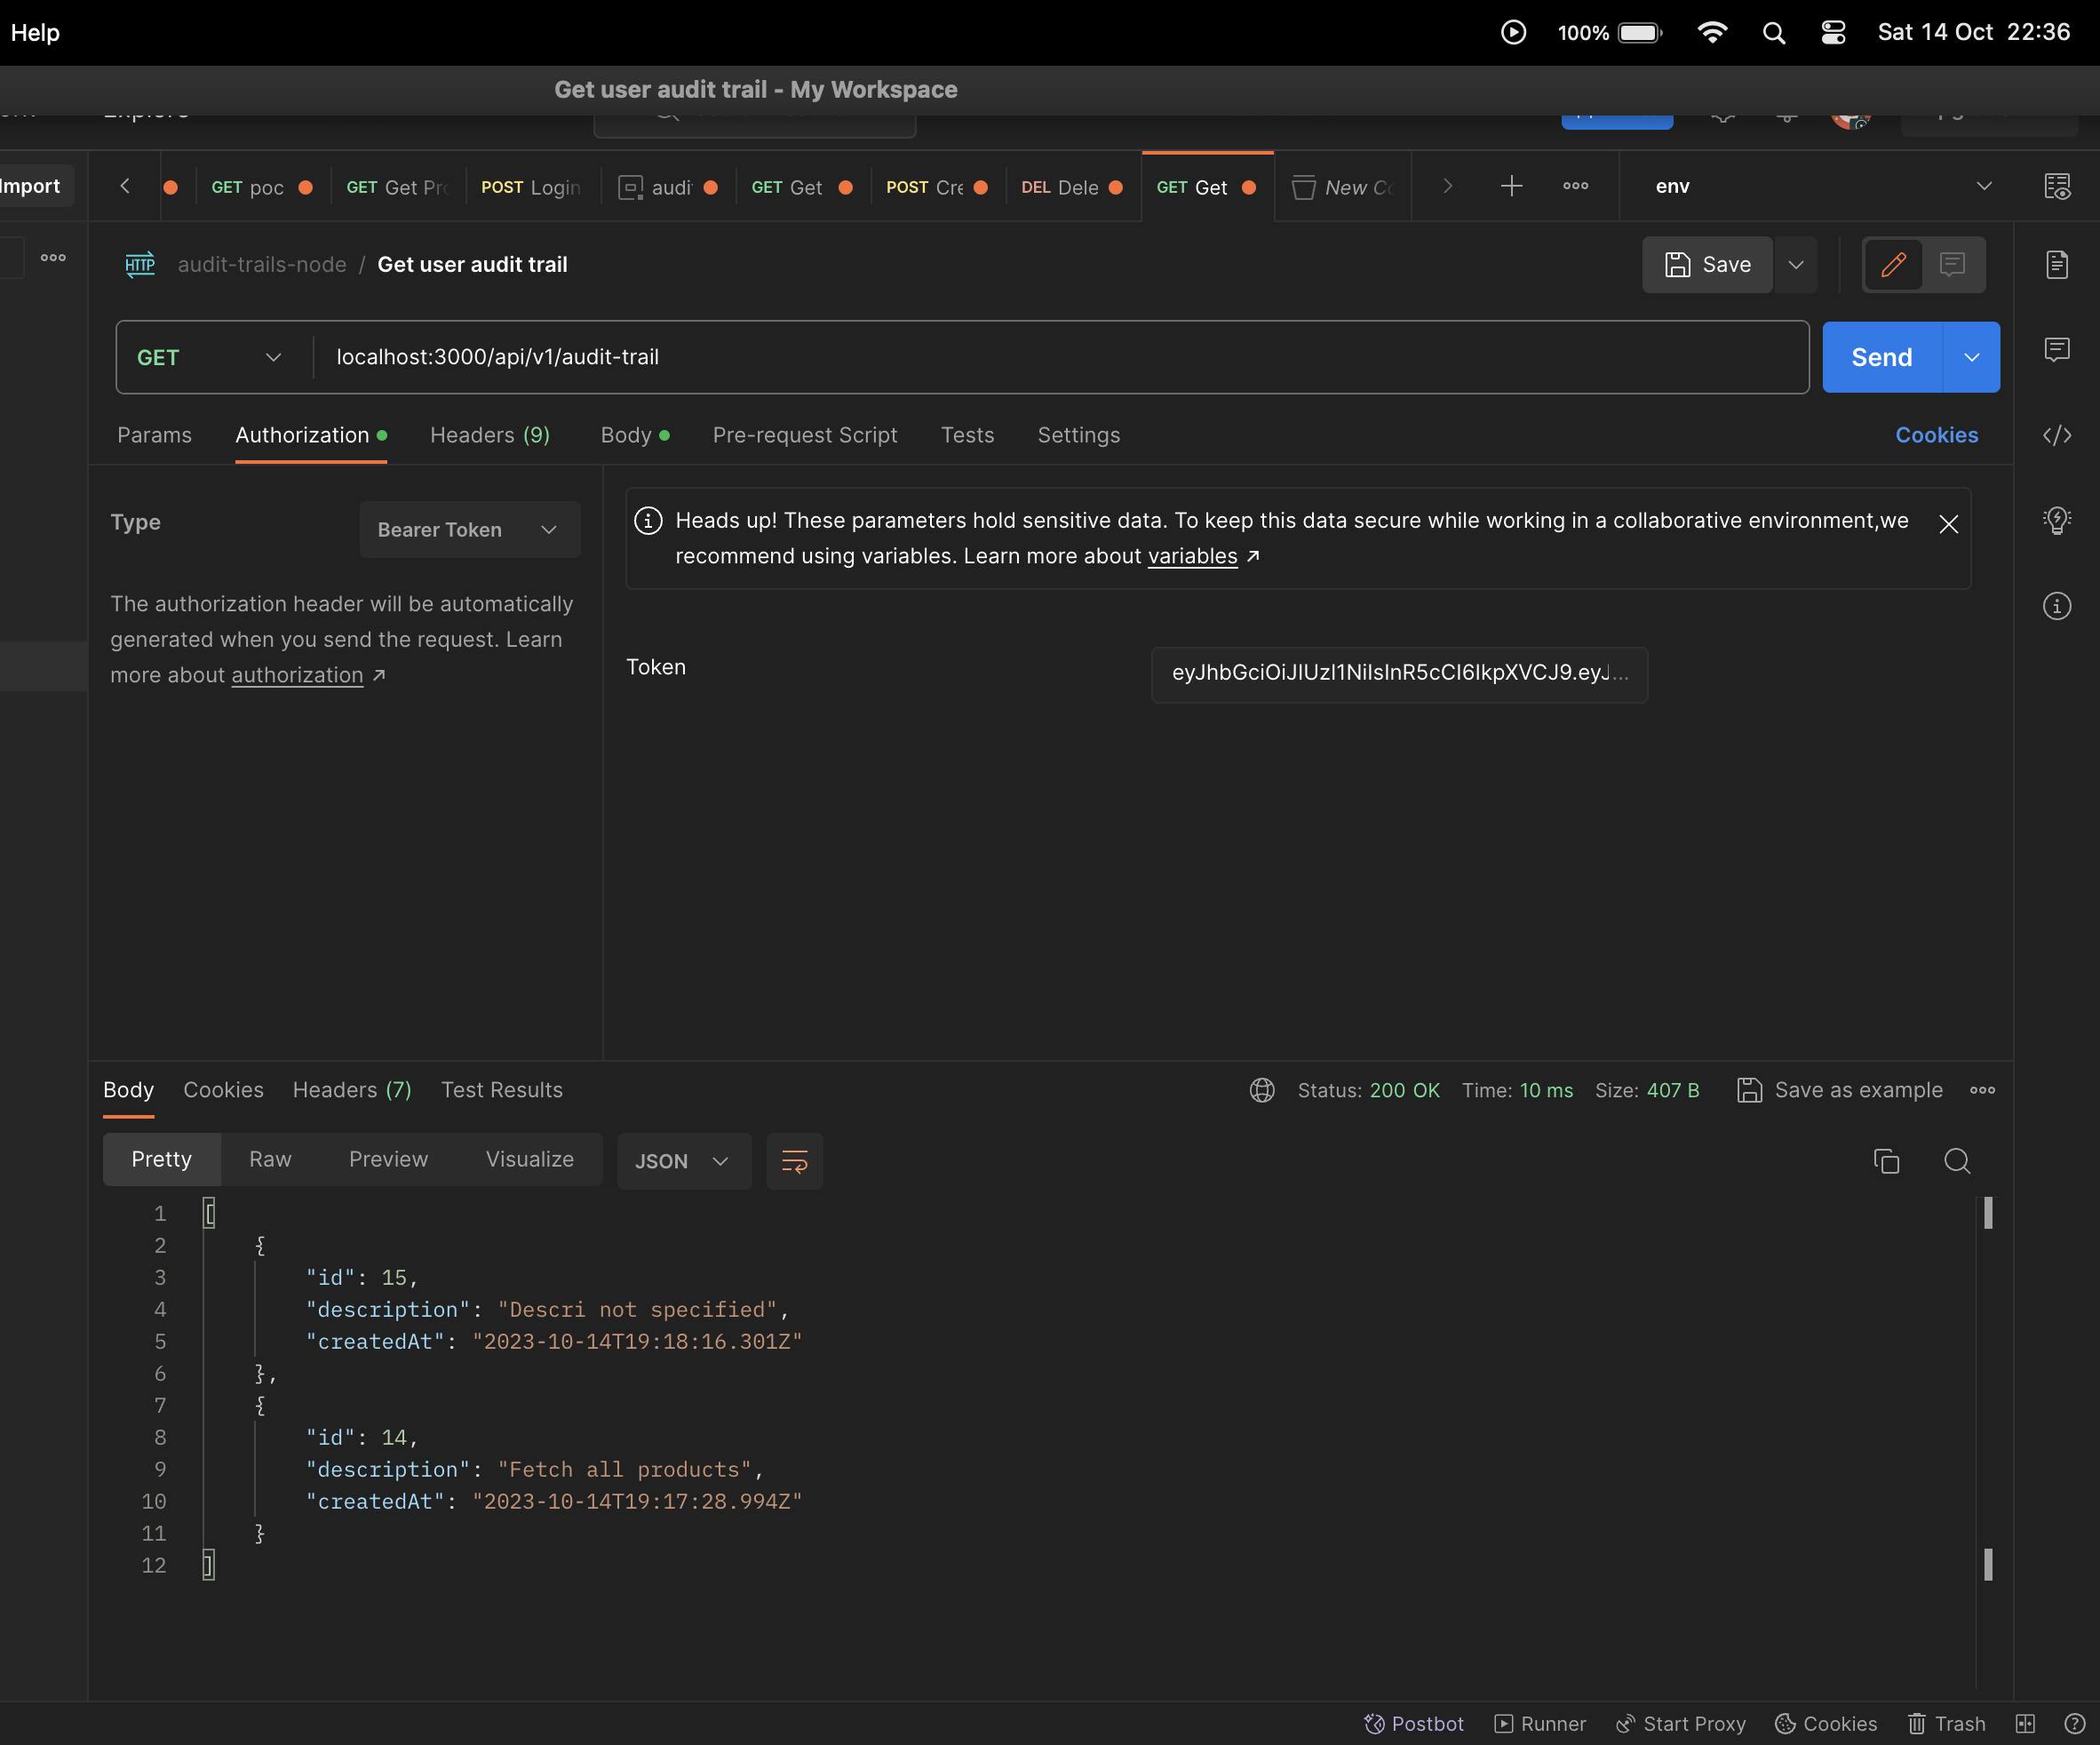
And test out the audit trails endpoint, tada, you should now see the newly created event log.
In this article, you have learned how to set up custom interceptors and decorators by building a simple Nest JS application. The next article shall cover how to dockerize the application and deploy the application to AWS by using DevOps tools such as Terraform, Jenkins and AWS.
Happy hacking.